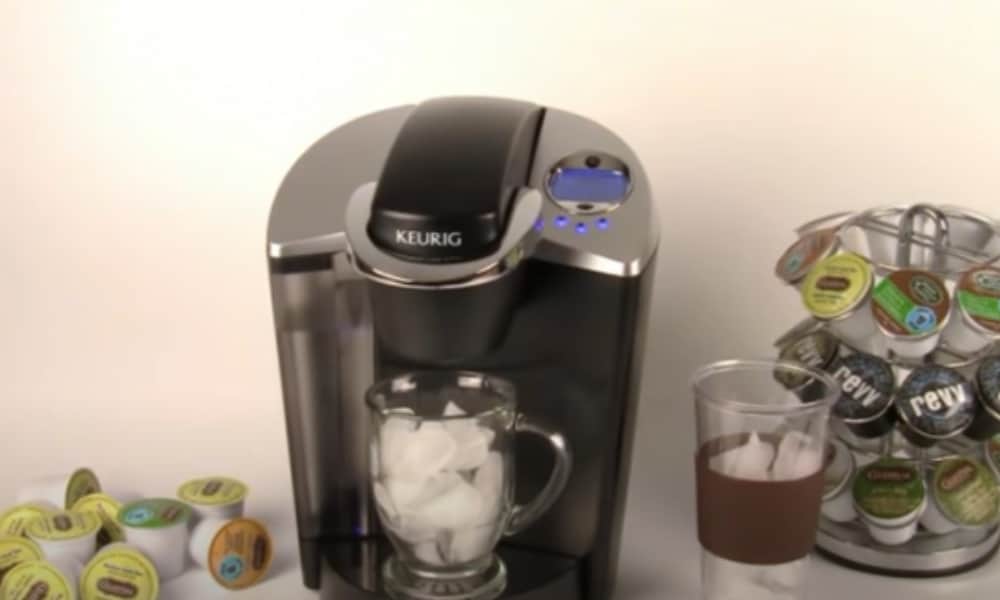
Ah, the Keurig – that one-cup coffee wonder! It’s made your life so simple. All you need is your preferred K-cup and at the push of button you have your coffee of choice.
But what happens when the temperatures climb? You still want your caffeine fix, but a cold drink is so appealing. Iced coffee is the obvious choice – but what about your Keurig? Are you going to have to abandon your favorite kitchen appliance for the summer months?
Absolutely not! Because it turns out your clever Keurig can make an iced coffee just as well as a hot one. The process is almost as simple too. There are just a few pitfalls to watch out for – we’ll talk you through them as we go.
So follow our guide on how to make iced coffee with a Keurig, and stay refreshed all summer long!
What you will need to follow this tutorial
Ingredients
-
K-cup of your choice
Some coffee experts say that darker roasts work better with the Keurig brewing process. But if you have a regular K-cup you enjoy, there’s no reason you shouldn’t use it for your iced coffee.
If you want to try something new, the K-cups designed specifically for iced coffee are a good bet. Green Mountain Coffee, manufacturers of the Keurig, offer a number of options.
There’s the Nantucket Blend for Iced Coffee for those who like their coffee pure and simple. If you prefer a hint of extra flavor, there are also hazelnut and vanilla options. Both provide a delicious sweetness served over ice.
The iced coffee versions are packed with more coffee. That’s to compensate for the added ice, which could dilute the flavor. But don’t worry. If you prefer to stick to your regular K-cup, we have some fixes to avoid a weak brew.
-
Ice
If you’re using a K-cup designed for brewing over ice, ordinary ice will work fine.
Remember though: tap water can transfer unwanted flavors to your coffee. If your tap water doesn’t taste perfect to you, avoid that happening by using filtered or bottled water instead.
If your preferred K-cup isn’t designed for iced coffee, you have two options.
You can stick with ice made from water if you like. The chances are, though, that you’ll end up with a drink that lacks flavor. If you enjoy your regular Keurig coffee, you may find this weaker version unsatisfying.
We’ve seen recipes that try to avoid this by putting the hot coffee in the fridge before adding it to the ice cubes. Don’t do this! The coffee might not be diluted, but it will be stale.
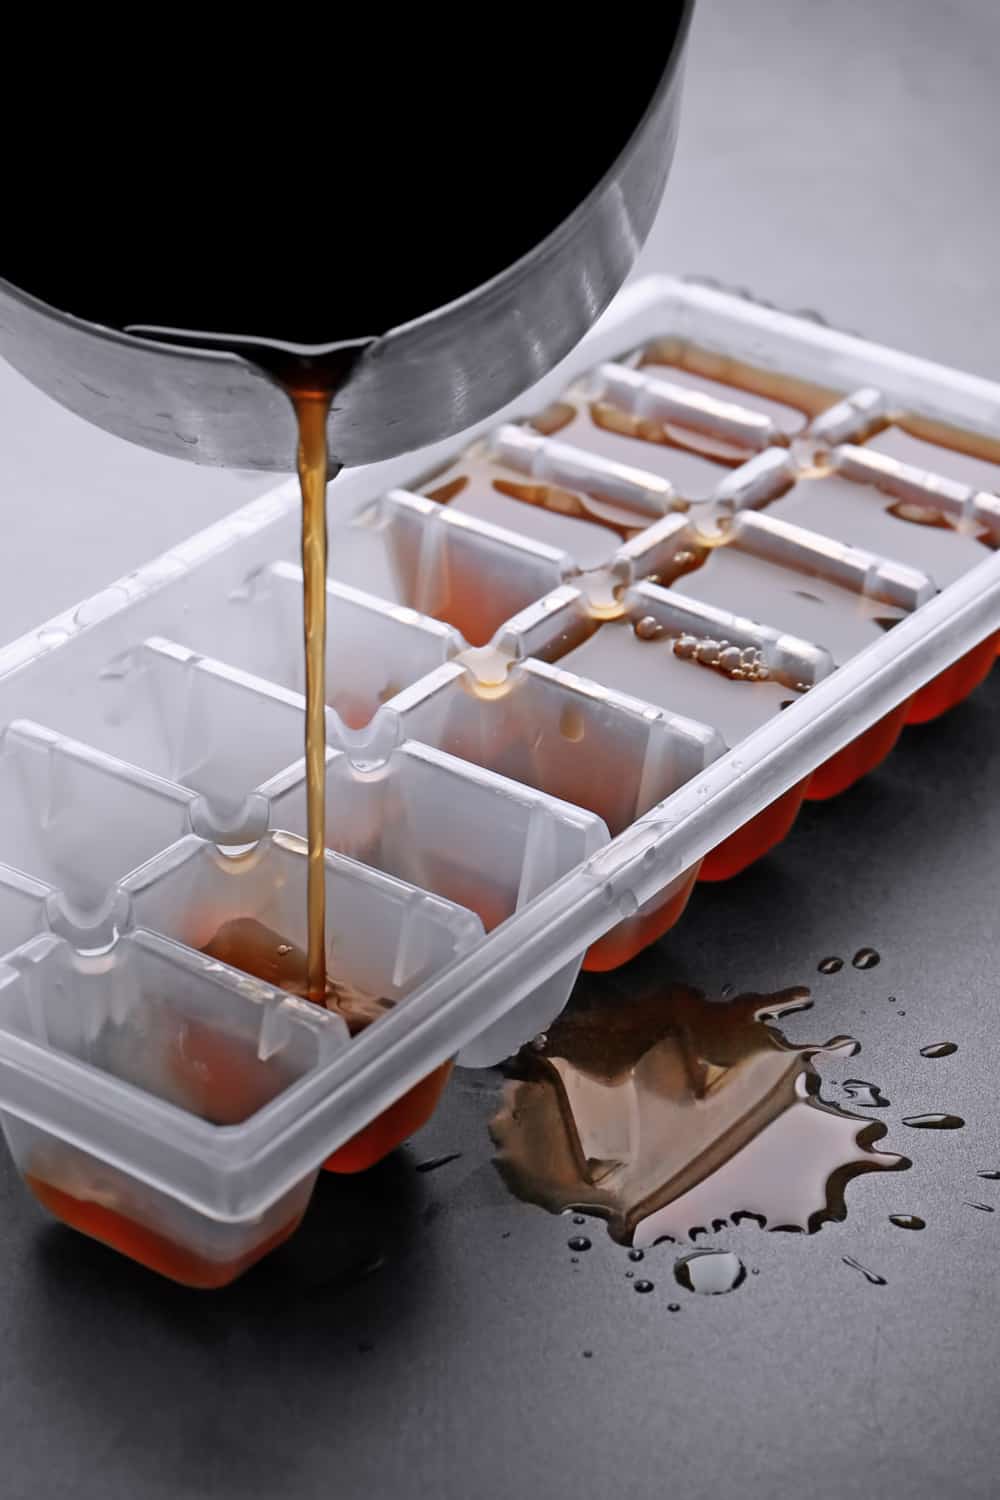
A better way to deal with the problem is to make ice from coffee instead of water. It’s very easy to do using your Keurig. We’ll show you how in step 1b.
-
Bottled or filtered water (optional)
The water you put into your Keurig will affect the flavor of your drink. To avoid any unpleasant tap water flavors, use bottled or filtered water instead.
This is a particularly good idea if you live in an area with hard water. Bottled or filtered water will cut down how often you need to descale your Keurig.
-
Milk and sugar or sweetener to serve (optional)
Equipment
-
Keurig
There are a wide range of Keurigs on the market. The good news is that they will all work perfectly well for iced coffee.
If, though, you’re looking for a new machine and expect to be making iced coffee a lot, look for one with a small serving size – ideally 3 ounces. That will give you a stronger brew to balance out the added ice.
-
Stainless steel cup
You’re going to be adding hot coffee to cold ice. That means you need a drinking vessel able to cope with different temperature extremes. Whatever you do, don’t use a glass! It will probably shatter, risking cuts and scalds.
A clear plastic cup is a tempting alternative. It will let you see your drink with all those ice cubes bobbing around! But as well as the impact on the environment, there are concerns about the chemicals that can leach into the body from plastics.
If your plastic cup is labeled as being BPA free, don’t be misled into thinking there isn’t an issue. BPA – bisphenol-A – was the first chemical to be highlighted as carrying health risks. Unfortunately, though, the alternatives used in BPA-free versions have also been cited as a cause for concern.
Chemical leaching becomes a particular problem when plastics are heated up. By the time you’ve added all that ice, it’s unlikely the coffee will have much heating effect on your cup. All the same, if you want to err on the side of caution, avoid plastic.
The best option is a stainless steel tumbler. It will also help keep your coffee cool for longer, particularly if it has a lid.
-
Mug or heatproof glass
This is for the “no coffee brew” at stage 2. It will only be holding hot water, so any heatproof drinking vessel will be fine.
-
Ice cube tray or portable ice maker
How to Make Iced Coffee With a Keurig
Step 1a: Prepare your ice – if you’re using a K-cup for iced coffee
If you’re going to be using a K-cup specifically for iced coffee, pour water into your ice cube tray. Either bottled or filtered water is best if you have any doubts about the tastiness of your tap water.
Now pop the tray into your freezer for an hour or two. If your freezer is the kind with drawers, use the top one to freeze your ice cubes fastest.
Of course, if you have a freezer with an ice cube dispenser, you can skip this step.
Step 1b – Prepare your ice – if you’re using a K-cup for hot coffee
If you’re using a K-cup designed for ordinary coffee, you have two options. If your Keurig has a very small serving size – ideally 3 ounces – feel free to make your ice with water. You can avoid a diluted drink by making your coffee strong. (We’ll show you how later.)
Alternatively, make coffee cubes instead. Just insert your usual K-cup into the Keurig, place a mug or small jug on the drip tray, and brew a coffee at your preferred serving size. Now pour the coffee into an ice cube tray and put it straight into the freezer.
This avoids the coffee going stale, but there is a disadvantage. Putting hot liquid into your freezer will increase its internal temperature. That means more energy will be used in cooling it again – so don’t be tempted to make too many cubes! And keep the ice cube tray away from other foods to avoid defrosting them.
Step 2 – Perform a “no coffee” brew
This stage ensures that by the time you make your coffee, the inside of your Keurig is at optimal temperature. That means hotter water to brew your coffee, and more flavors from the K-cup.
To do this, fill your reservoir with water (as before, bottled or filtered water is best). Place a large mug on the drip tray. Now open and close the K-cup compartment, and push the button for a long brew.
Hot water will come out of the Keurig into your mug. When it’s finished pouring, flush the water away.
Step 3: Add ice to your cup
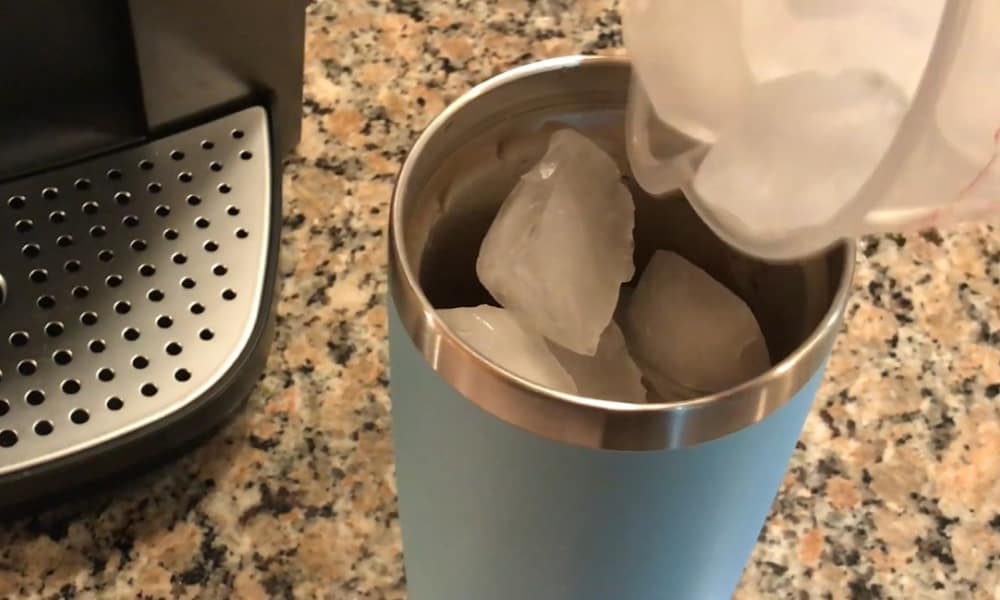
Fill your stainless steel cup three-quarters full with the ice or coffee cubes you prepared earlier.
Pro Tips: Don’t use the mug you used for your “no coffee” brew. It will have been heated by the water and you want your iced coffee to be cold.
Remember to leave enough room for the coffee! Now place the cup on the drip tray.
Step 4: Brew your coffee
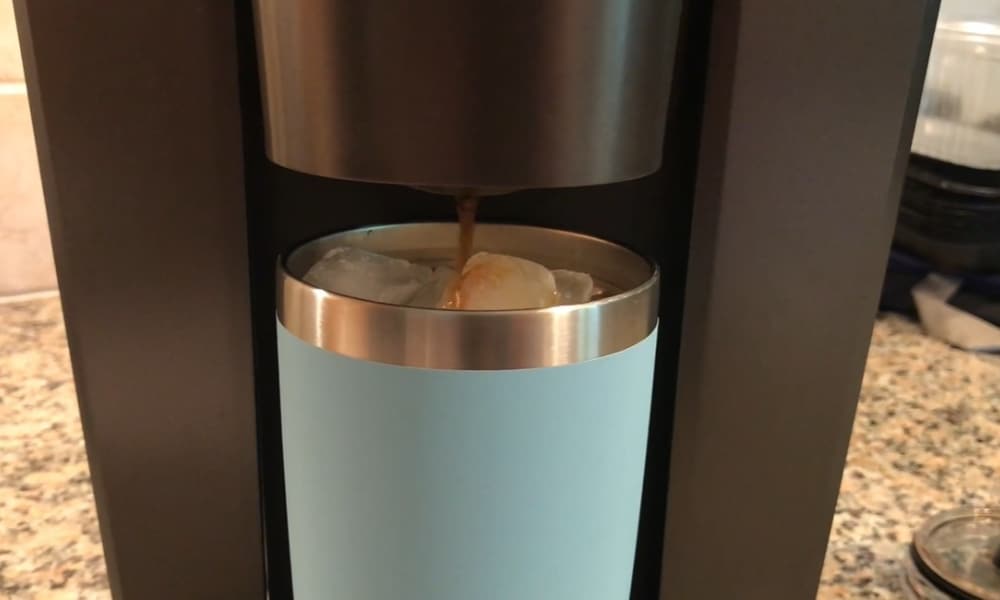
Insert your chosen K-cup into the compartment. Wait for the display or indicator light to say “Ready to brew”. Push the button for the smallest brew size.
Pro Tips: If you want a longer drink, don’t be tempted to select a larger serving! Your Keurig will simply add more water to the coffee in the K-cup, making it weaker.
Instead, insert a second K-cup and repeat the process with the smallest brew size. You’ll get a longer drink with the same intensity of flavor. This approach will give good results even with an ordinary K-cup and ice cubes made from water.
Step 5 (optional): Add milk or sugar
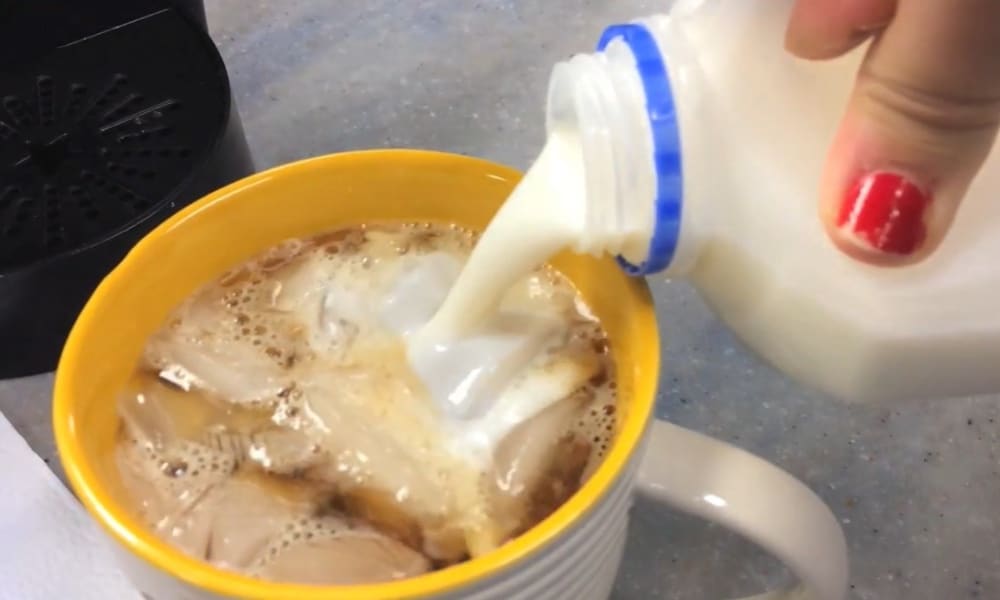
Many people prefer iced coffee black, but there’s no law against adding milk if you prefer! Similarly add sugar – or sweetener, for a healthier option – if you want a sweeter taste.
Now sit back and enjoy your delicious iced coffee. Just remember to pop some more ice cubes in the freezer for the next one!
Conclusion
We hope you’ve enjoyed this tutorial. There’s nothing more delicious than an iced coffee on a hot day. And there’s no easier way to make it than with a Keurig.
The key to great results is to get the strength of the coffee right. Experiment with coffee or ice cubes, serving sizes and even different K-cups to get the drink that’s right for you.
We’d love to hear how you get on! If you have any questions, please comment and let us know. And if you’ve enjoyed this article, please share it.
Resources
- HOW TO MAKE THE ABSOLUTE BEST ICED COFFEE WITH KEURIG
- How To Make Iced Coffee With a Keurig In 5 Easy Steps
- 5 Minute Iced Coffee: How to Make Iced Coffee With a Keurig
- How to Make Iced Coffee with Keurig (Recipe & Pictures)